Friday, September 30, 2011

chevron stripes...

Are you crafting this evening or tomorrow?

If you are, be sure to stop over to Live Pink, which is Pink Paislee's forum, for some card inspiration this weekend! There will be 7 card challenges and 7 chances to win! My challenge is a COLOR challenge - "pair a neutral base with colorful accents", but I'm also going to show you how I created this EASY chevron technique!


Chevron seems to be all the rage these days. I found a quick and simple way to make the large Chevron stripe across my card! Come on over to Pink Paislee to see how! HOPE to see you there - we'll begin at 6 pm tonight EST! :) You'll have until Sunday evening at 11:59 pm EST to finish any of the challenges. HERE is a link to my challenge. :)


Just For You card:
Stamps: Tranquility Trilogy (sentiment) by Papertrey Ink
Ink: True Black by Papertrey Ink
Paper: Mistables paper by Pink Paislee (text), Hometown Summer by Pink Paislee (star), Nantucket by Pink Paislee (stripe)
Dies/punches: 1 1/2" square punch by Marvy Uchida
Hometown Summer Baubles by Pink Paislee.

Thursday, September 29, 2011

celebrate today...

What are you celebrating today? Sometimes it's so easy to focus on the negative and complain about what we don't have or what we aren't, so I thought it would be fun to post what I'm celebrating today...

Today I'm celebrating rainy fall days, pretty colorful leaves falling and looking forward to the cooler weather with NO mosquitoes.

Tomorrow is my nephew's varsity homecoming game, so I'm looking forward to the ceremony they are going to do before the game for the seniors. Also, my 6 year old will be doing her half time dance during the varsity game! I'm thankful that my girls love cheering so much and are having fun with it this year.

I'm thankful that this cold is going away, and I'm starting to feel much better.

I'm happy that my mom just celebrated her 60th birthday is still very healthy and happy. I don't know what I'd do without her! I'm so lucky that we have a relationship like we do.

I'd love to hear what you are celebrating today in your life...

Celebrate Today card:
Stamps: Think Big Favorites #4 by Papertrey Ink
Ink: True Black by Papertrey Ink
Paper: Emma's Shoppe by Crate Paper, Dots & Stripes by Echo Park (brown)
Other: vintage book paper - JBS, chipboard - Crate Paper - Emma's Shoppe

Tuesday, September 27, 2011

World Card Making Day and a winner...

I have a fun event to tell you about....did you know October 1st is World Card Making Day? YES, there is a day just for card makers! Woot! Pink Paislee will be celebrating and giving you lots of chances to win, so I hope you will join us there!
Visit the Pink Paislee LIVE PINK FORUM on Friday evening through Sunday evening to chat with us and participate in 7 fun challenges!

Next up on the agenda is to choose a winner from my Season's Greetings giveaway!

Random Integer Generator

Here are your random numbers:
63
Timestamp: 2011-09-27 17:42:12 UTC

Crystal said... 63
Yes, please!! I love your creations - you always inspire me :) Thanks for sharing.
Congrats, Crystal!! Please send me your mailing address to dflanders71@hotmail.com.

Thursday, September 22, 2011

gingerbread joy...

Here is a quick layout I made today with the Season's Greetings line by Echo Park! (See post below for a giveaway of this line!)

When Kati was in Kindergarten last year, her class made little gingerbread houses from scratch and the parents were invited to come join in on the fun. You can imagine my excitement, as a scrapbooker! lol
Well, I got all ready to go to her class, went out to start my car, and it wouldn't start. It was SO cold out. I went inside and emailed her teacher to let her know I wasn't going to make it. My husband was already gone to work, and I had no way to get it started. I cried. I was so sad I couldn't be there to help out. I did get photos of it when she came home. Not sure why I don't have any photos of her with it though!

You can see here on this close-up, I made a little house to hold one of the wallet sized photos...
Love the gumdrop path she made to her house and the little Twizzler door. lol
I used the 12x12" Season's Greetings papers, the chipboard, brads and stickers. I just noticed that this line is available HERE at 2peas.

Don't forget to leave a message in my LAST POST for the Season's Greetings giveaway! The giveaway is still open to win this fun line.

a little Christmas cheer...

Good morning! Remember this post when I said I was going to be doing a few retail kits here and there starting in the fall? Well, that company happens to be Echo Park and I'm loving their stuff lately. Did you know they come out with a new line or two EVERY month? I had no idea! I don't know how they can crank out such cute lines so fast.

They have two new Christmas scrapbooking lines that just came out this month. One is called Season's Greetings. It's SUPER cute in person. Here are a few cards I've made with it so far. I used the 6x6" paper pad for these, along with some of the other embellishments - chipboard, brads, etc!

I wanted this one to look like a little present. I had a small piece of paper leftover on my table, so I wrapped it in twine and topped it off with some chipboard. VERY simple.

On this card, I layered a few of the 6x6" papers, then added a chipboard snowflake, sticker and chipboard star.
I tied the ribbon around the papers before adhering to the card front, then added the little "christmas cheer" chipboard piece over the ribbon.

On the "holiday traditions" card, I put my sewing machine to work and stitched some little dangles for the ornaments with a stitch that looks like little snowflakes. (My sewing machine is a Singer and this is stitch #30, in case you are wondering.)

On the "Believe" card below, I turned one of the journaling cards upside down and tied the twine around it through the hole at the bottom of the tag before adhering to the card. I cut a Damask Snowflake out of felt with a Papertrey Ink die, then added some chipboard over the top! It came together very quickly.
Don't you love these brads? Adorable.

I can't wait to play around with the stamp set too.

I just happen to have an extra set of these 12x12" Season's Greetings papers, the Decorative Brads and the Clear Stamps that match this line! Please let me know if you'd like to be entered to win this little giveaway and I'll choose a random winner soon. Thanks so much for stopping by today. Hugs,

Tuesday, September 20, 2011

Crafter's Workshop blog hop with Julie Balzer...

I am very excited today to be part of a blog hop using new Crafter's Workshop stencils by Julie Balzer! If you don't know of Julie, you are definitely missing out on some awesome artistic creativity - to say the least! Julie is the queen of misting, painting and creating FAN-tastic works of art. Here is a link to her blog. There is always something new and inspiring to see by Julie! She is truly one of a kind, and I feel so fortunate to be asked to participate in a hop showcasing her new stencils!

I received some of the 6x6 stencils and as a card maker, I wanted to show that these are great for cards! What I love is that you can use them over and over, so an endless supply of cards could be made with each stencil. Each style is available in 12x12" AND 6x6".

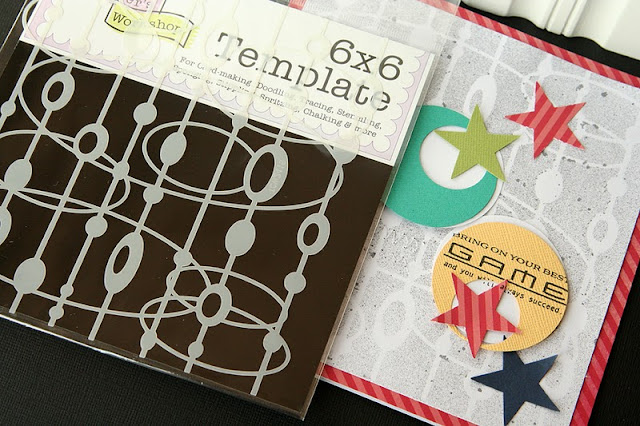
The first one I worked with is a mod looking one called Love Beads.

I sprayed over it with Graphite Glimmer Mist by Tattered Angels and added a few stars and circles with cardstock! The sentiment is from Boy Basics: Game On by Papertrey Ink. I wanted my circles to look mod too, so I punched 2" circles, then punched out a 1" circle from it and layered them over a white cardstock circle. You could definitely make the background darker by adding more mist. I just did a light dusting here! (Red paper is Echo Park's new line called Season's Greetings.)
On the second card, I tried something different with the Summer stencil. Let me show you the card I'm referring to...

I was spraying over the stencil just playing around with it, adding yellow and pink mist over the top (below right), when a lot of the mist pooled up on the stencil and instead of washing it off, I flipped it over onto the cardstock (left side). This created a stamped look!

I decided I wanted the look on the left, but I wanted her hair to flip the other way. So I turned the stencil over (starting on the back) and used the same technique - first spraying the stencil with mist, letting the mist pool up, then flipping it over and laying it on the cardstock. Then pressed it down like I was stamping. (The sentiment here is from Sweet As Can Be.)

So...long story short...I discovered you can use the front OR the back to stencil with!

Here is one more card using the Screen stencil.


I actually made a Christmas card with it! I sprayed over the stencil with a green mist onto kraft cardstock. It started as a fall card, but since I had Christmas goodies on my desk, I went with that! I cut a snowflake out of white felt with a Papertrey Ink die called Damask Snowflakes, then added a few Echo Park chipboard pieces over the top. The sentiment here is from Christmas Blessings.
This background could be used for so many things!

And last, but not least, Henna Hands...

I chose two of the hands I liked the best and chalked over them with chalk! I added a sentiment from  Love Lives Here, a resin swirl by Melissa Frances and a purple twine from the Twinery. The effect with the chalk is very subtle and soft. (I would recommend sealing it after you are done if you use chalk, so it doesn't wipe off. The first hand starting wiping off while I was working on the second hand!)

Well, I hope you enjoyed these examples. Please visit a few more crafty girls for a variety of fun stencil ideas, and don't forget Julie's blog for a chance to win!

Monday, September 19, 2011

four photos...

Hello! Are you in the mood today to scrap a layout with lots of photos? My second assignment for Pink Paislee this month is to use four photos on a layout and use the new Vintage Vogue collection. I've been wanting to document how different my two daughters are. They are opposite in so many ways.

When I saw these two little ladies from the Vintage Vogue Chipboard Pops, I knew they would be perfect for my page! I layered them and added one of the Spool Buttons and a little flower from the chipboard pops. I used a floral stamp from Papertrey Ink called Guidelines 2 and stamped in a circular pattern to ground the title with Raspberry Fizz ink.

I used Papertrey Ink True Black polka dot ribbon and loved how it went with the black and white theme, so I made two loops and added a stick pin, then a Vintage Vogue Paper Rosette over the top.

I added a few strips of patterned paper and two of the Vintage Vogue ribbons, then printed out journaling to add to the bottom of the layout. The last thing I did was punch out my photos with a 2″ punch by Fiskars and adhered them along the side of the page.
I love the little Vintage Vogue Brad Mix. Here I’ve added a few tiny brads to a large Autumn Rose button.

Here is the journaling...
If you were a scrapbooker about 10-11 years ago, you'll recall punching your photos into shapes like this. I think the trend just might be returning! I am liking it again...are you?

Friday, September 16, 2011

decoupaged handmade ornaments...

I'm so excited to show you some handmade ornaments I created the other day for one of my Papertrey Ink projects. They are sort of shabby and vintagey in feel. These were made very simply with a few wooden items from the craft store, some chandelier crystals and tinsel by Melissa Frances, tissue paper and stamps/ink!

Here are the supplies I used for one ornament (in this order from top to bottom):


I have 1 small chandelier crystal from Melissa Frances, a small wooden ball (1/2"), a wooden acorn (1 1/8"), a toy wheel (1"), a large wooden ball (2"), another toy wheel (1"), a medium ball (1"), and a long skinny chandelier crystal by Melissa Frances. These are all hot glued together in this order, and then I painted the whole thing white with acrylic paint. (Don't paint the crystals!) You can find these wooden pieces in the wooden section of your craft store. 

The crystals actually have a hole in the top of them, perfect for tying a string on for hanging. These are the tops of the ornaments.

These are the bottoms. I just love these crystals.

After I hot glued all of the pieces together and painted it white, I had to figure out a way to add the sentiment. If I stamped directly on the curved surface, it wouldn't work out so well. So, I thought I'd stamp onto a piece of white tissue paper and glue it on the front. I used Papertrey Ink's Christmas Blessings stamp set for the sentiments and the Holiday Photo Finishers for the swirls. I stamped the swirls first in a lighter color, such as gray or brown, then the sentiment in black, then tore out the image from the tissue paper.


Next, I added some wet glue to the center of the ornament on the large ball. The stamped tissue paper is placed over the glue and pressed down, making sure to press all of the edges down. Then I added more wet glue over the top of the image as well to seal it to the ornament. I used Tombow Mono Liquid Glue, but Mod Podge would work as well.
It's ok if the image gets a little wrinkled in the gluing process. To me, that's all in the charm of this piece! Here is the stamping on the other ornament before I applied it.
After adding the sentiments, hot glue a strip of tinsel around the top of the large ball.
The stamping does seem to get a bit lighter when you add the glue over the top, so be sure to do a darker stamping than I did here for the swirls....unless you want them to be subtle.

The finished size of these are almost 8" long. I think they'd be adorable as a set for Christmas, hanging over a mirror, hanging from a mantle!

Thursday, September 15, 2011

cards on the 15th...

Good morning all! It's the 15th of the month and you know what that means....I get to share some work I did with the new Papertrey Ink stamps for this month! I had a blast with all of the new Christmas items (which you can see here)!

This one was made with the new Tri-fold cards, but I cut the top layer of the card back a little bit to let the second page show through, where I stamped, "jolly" and the snowflakes. Adds a fun detail.

Tis the Season card:
Stamps: Winter Cheer by PTI
Ink: True Black, Smokey Shadow, Pure Poppy, Hawaiian Shores by PTI
Paper: Crate Paper (black polkadot), Aqua Mist cardstock by PTI, tri fold card by PTI
Dies: none
Other: snowflake by Target (Holiday Table Scatter), Twinery twine, 2" circle punch.
------------

This one is super cute and brightly colored in person. The lime green and red look so cute together. This set is Christmas Labels and as you can see, has a retro vintage vibe, hence the colors I used together here. I layered lots of stamping for a fairly flat card (except the brad) that has a lot of depth to it.


I am really loving stamping on patterned paper lately! To create the slightly distressed edges, see my last blog post. The Tim Holtz blending tool works awesome for that.

Holly Jolly card:
Stamps: Christmas Labels, Love Lives Here Holiday (stars)
Ink: Spring Moss, Hawaiian Shores, Pure Poppy by PTI, brown by Ranger Industries
Paper: Vintage Vogue by Pink Paislee
Dies: none
Other: brad by Pebbles, snowflake by Target (Holiday Table Scatter).
------------

Here's an adorable set called Holiday Lights! There are little images of different kinds of bulbs to use with the string of lights- little stars, balls or pointy lights. Here I wanted to use the balls on the string, so I could create a large ball for my sentiment and hoped it would resemble a light hanging from the string.
I've used some Crate Paper for the background and photo corners and Dawn's new Candy Cane Prints for the stripe on the bottom. The ornament was stamped with Candy Cane Christmas.
String Up the Lights card:
Stamps: Holiday Lights, Candy Cane Christmas
Ink: Pure Poppy, Hawaiian Shores, Orange Zest, Spring Moss, Dark Chocolate and a light brown and pink from my stash
Paper: red and teal cardstock, Candy Cane papers by Dawn McVey, Crate Paper
Dies: 2" circle punch
Other: pearl by Melissa Frances.
-------------

Straying from Christmas a little bit here for a second, this card was made with the new Flower Fusion #8.
The stems were stamped onto a Melissa Frances die cut, and I embossed the dandelions with white embossing powder. Paper is Pink Paislee - Nantucket (stripe) and Vintage Vogue (pink).
Just Dandy card:
Stamps: Flower Fusion #8
Ink: True Black, Fresh Snow, Spring Moss
Paper: red, white, yellow cardstock and yellow stripe is Pink Paislee - Nantucket, pink circle is Pink Paislee - Vintage Vogue
Dies: none
Other: 1" circle punch, embossing powder, Upper Crest border punch by Fiskars, Papertrey Ink twine, Melissa Frances die cut. 
------------

This one includes stamps from the Bells & Boughs set. I also used the die that goes with the set to create the felt bow.
The red stripe was die cut with the new Holiday Photo Finishers dies. These could be used for so many things and lots of previous stamp sentiments that you have will certainly fit into the center of these strips! I tried my hand at a new stitch from my sewing machine that sort of looks like a snowflake. One tip with this card, make sure the white stamping is dry before adding the black sentiment over the top. I used a heat gun to speed up the process!
Merry Christmas from our Family to Yours:
Stamps: Bells & Boughs
Ink: True Black, Fresh Snow
Paper: new Candy Cane striped papers by Dawn McVey, kraft cardstock
Dies: Bells & Boughs, Holiday Photo Finishers
Other: burlap ribbon, Melissa Frances pearl, machine stitching at top, Papertrey Ink felt.
-------------

This one is super simple to create - just stamped various snowflakes in white and wrapped a crocheted flower around the edge of the card with some twine. Couldn't get much easier than that.

 Warm Winter Wishes:
Stamps: Tag-its #8
Ink: Fresh Snow, True Black
Paper: kraft cardstock by PTI
Dies: none
Other: Twinery twine, Melissa Frances pearls, crocheted flower by Close To My Heart.
------------

You can see all of my projects for the month HERE.

I'll be back tomorrow! I have another tutorial to share with you on making vintage looking Christmas ornaments with wooden items from the craft store...and using stamped sentiments on the rounded fronts! Stay tuned.... :)